
SHT41 · ESPHOME · HOME ASSISTANT
SHT41 ESPHome Guide: ESP32 Wiring, YAML and Home Assistant Setup
SHT41 works with ESPHome's native sht4x component. Configure its I²C bus, use 0x44 for the standard SHT41-AD1B and leave the heater off for the initial setup. The ESP32 can then send temperature and relative humidity to Home Assistant through the native API. ESPHome SHT4X component, Sensirion SHT4x datasheet
The first useful milestone is a pair of temperature and humidity readings that continues updating in the device log. Once that works, connect the node to Home Assistant and check that the same readings arrive there. If progress stops, the last successful observation tells you where to investigate.
Reference build: a USB-powered classic ESP32 DevKitC with an ESP32-WROOM-32 module and an Adafruit SHT41 breakout. The complete configuration targets ESPHome 2026.10.1.
Start with the situation you have
| Your starting point | Go directly to |
|---|---|
| A new ESP32 and sensor | Wiring, then the complete new-node configuration |
| An ESPHome node that already works | Add the SHT41 configuration |
| An online node with missing values or read errors | Check the local measurement log, then follow the relevant fault branch |
Choose one configuration path. Both lead to the same local-reading check and Home Assistant connection. If you already have values but question their accuracy, go to the placement and enclosure check.
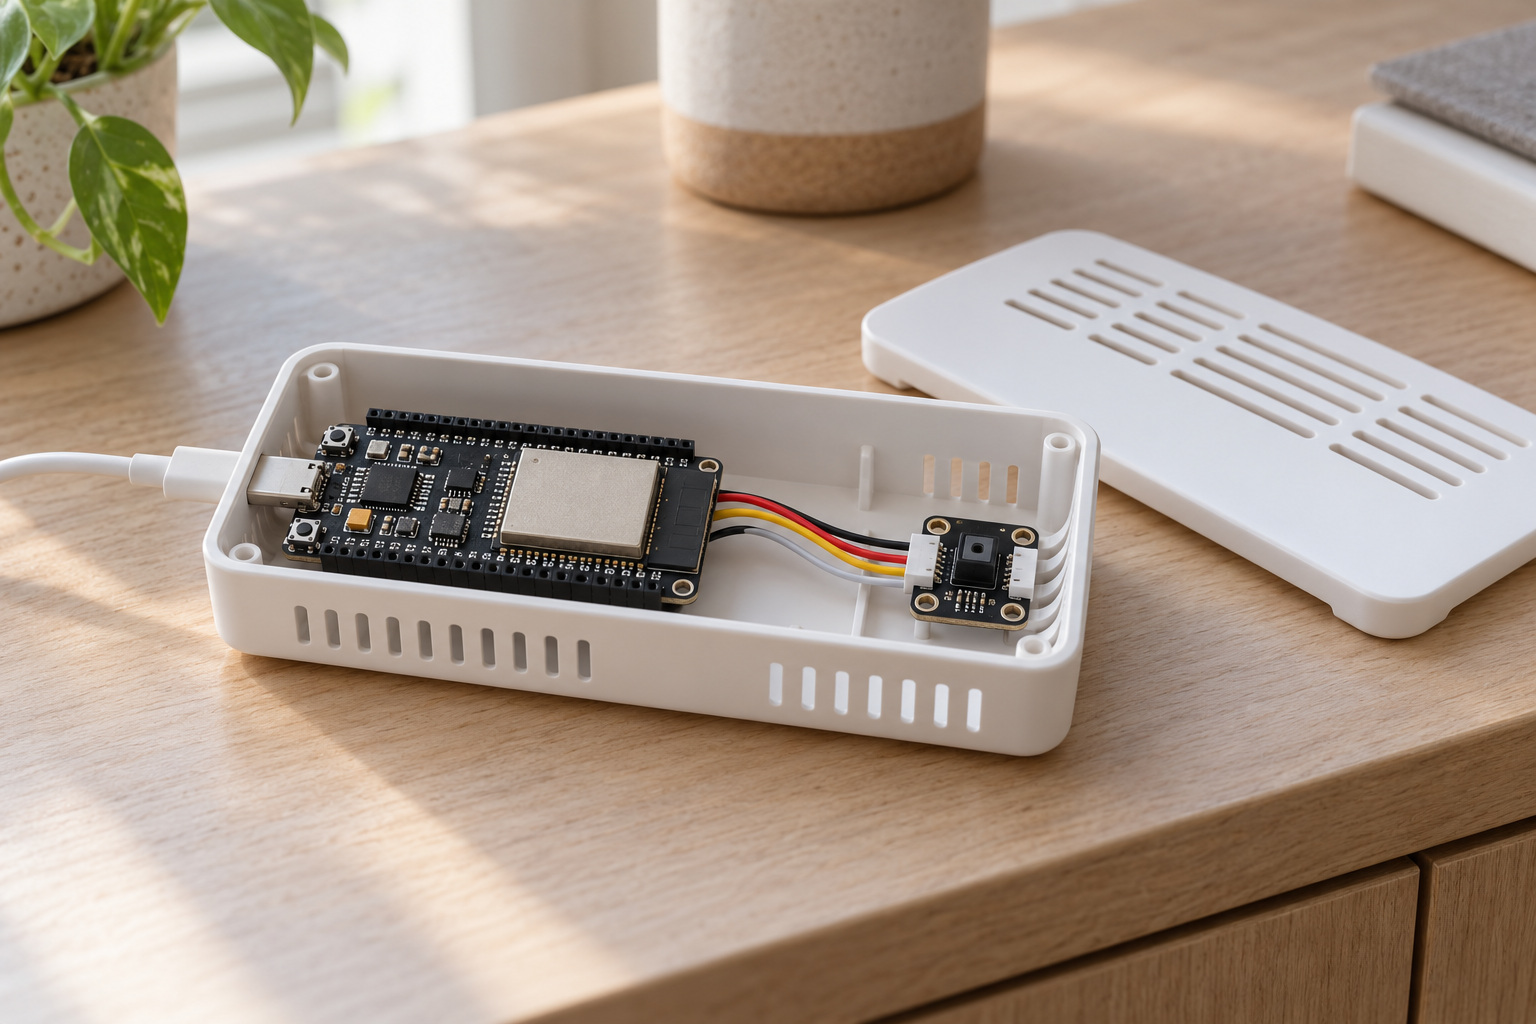
Connect the SHT41 to the ESP32
Start at the board labels. Correct power and signal connections give the firmware a device it can actually communicate with. Prepare four short jumper leads and a data-capable USB cable, then disconnect USB power while making the connections below.
| Classic ESP32 DevKitC | Adafruit SHT41 breakout | Purpose |
|---|---|---|
| 3V3 | VIN | Board supply |
| GND | GND | Shared ground |
| GPIO21 | SDA | I²C data |
| GPIO22 | SCL | I²C clock |
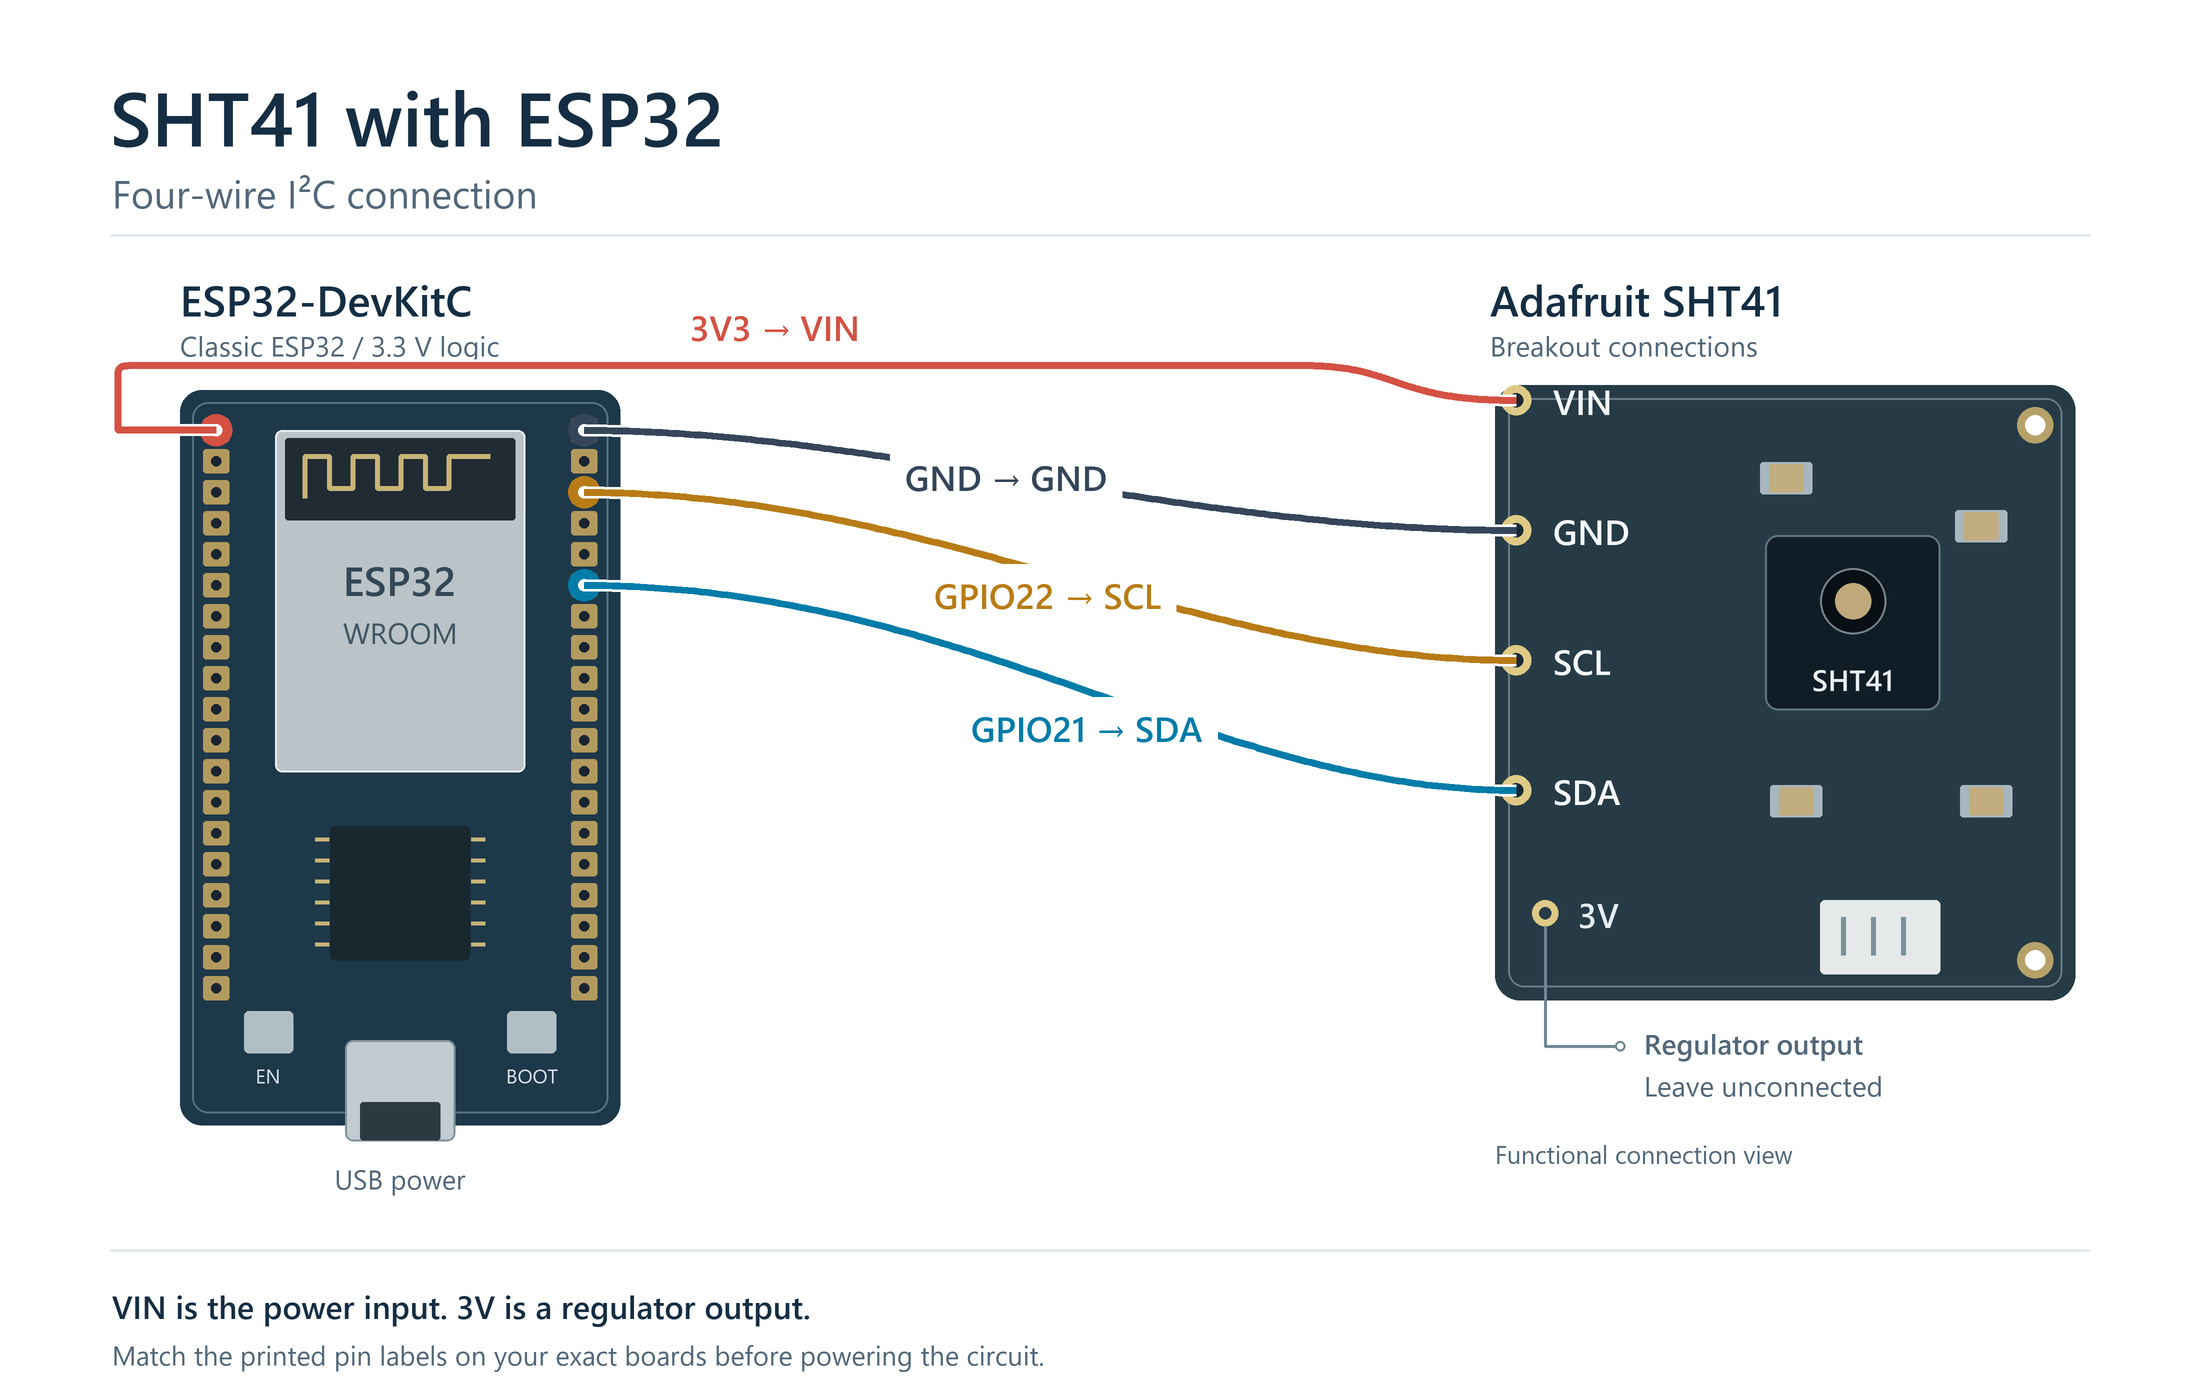
On this breakout, VIN is the board power input and 3V is the regulator output. SDA and SCL include level translation and 10 kΩ pull-ups. These board features apply to the documented Adafruit breakout. Adafruit pinouts
Identify an unfamiliar module before powering it. The standard SHT41 chip has a 1.08–3.6 V supply range, while a board's VIN rating depends on its circuitry. Check its input rating and I²C pull-up rail. The SHT41 voltage guide explains the checks.
Before reconnecting power:
- Match SDA and SCL to the printed labels at both ends.
- Check soldered headers and the common ground connection.
- Begin with the SHT41 alone on short leads.
- Account for existing pull-ups before adding more; pull-ups on several boards act in parallel.
GPIO21 and GPIO22 belong to this classic ESP32 baseline. Select exposed, suitable pins for an ESP32-C3, ESP32-S3 or another board. Espressif DevKitC documentation, ESPHome I²C configuration
Connection checkpoint: confirm all four connections against the table, including the common ground. Then choose the new-node or existing-node configuration below. The startup scan will provide the first communication check after installation.
New node: use the complete configuration
With the wiring checked, the next step is to give a new ESP32 its firmware configuration. Create a device in ESPHome Device Builder, choose the classic ESP32 target and open its YAML editor. This example selects ESP-IDF and variant: esp32. ESP32 platform configuration
Prepare these values in secrets.yaml, in the same ESPHome configuration directory. Device Builder provides a secrets editor:
wifi_ssid: "YOUR_WIFI_NAME"
wifi_password: "YOUR_WIFI_PASSWORD"
sht41_api_key: "PASTE_THIS_DEVICE_API_ENCRYPTION_KEY"
Replace all three placeholders. Use the API encryption key generated for this new node, or generate a 32-byte Base64 key using the ESPHome API documentation. Keep that key for the Home Assistant connection step.
Save the following as sht41-room.yaml:
esphome:
  name: sht41-room
  friendly_name: SHT41 Room

esp32:
  variant: esp32
  framework:
    type: esp-idf

logger:
  level: VERBOSE
  initial_level: DEBUG
  logs:
    sensor: VERBOSE

api:
  encryption:
    key: !secret sht41_api_key

ota:
  - platform: esphome
    encryption:

wifi:
  ssid: !secret wifi_ssid
  password: !secret wifi_password

i2c:
  id: sensor_bus
  sda: GPIO21
  scl: GPIO22
  scan: true
  frequency: 50kHz

sensor:
  - platform: sht4x
    i2c_id: sensor_bus
    address: 0x44
    temperature:
      name: Temperature
      id: sht41_temperature
    humidity:
      name: Relative Humidity
      id: sht41_humidity
    precision: High
    heater_max_duty: 0.0
    update_interval: 30s
Before installing: check the GPIO assignments, the three secret names and the ESP32 variant. Validate the file and install it over USB, confirming that you selected the intended ESP32. Then go directly to the local measurement check.
The example uses a 50 kHz bus, high repeatability and a 30-second update interval. Heating is disabled. The interval is an initial room-monitoring choice, not a guaranteed thermal-recovery period. The new-node OTA setup reuses the API key for encrypted updates. ESPHome OTA documentation
Existing node: add SHT41 without replacing the node configuration
A working ESPHome node already has its board and network configured. Build on that starting point by retaining its device name, board, Wi-Fi, API and OTA settings. Add the SHT41 sensor, its bus connection and the logging needed to check the result.
Before copying the entries below, match them to the configuration you already have:
- Existing I²C bus: retain it and use its actual ID in the sensor's
i2c_id. Add the shown bus only when those pins have no bus configured; match the GPIOs to your board and wiring. - Existing
sensor:list: append the SHT41 entry to that list and keep one top-levelsensor:section. - Existing
logger:block: merge the shown levels and preserve any other tag settings you need. This makes the measurement messages visible in the next check.
For the reference classic ESP32 wiring, merge these entries:
logger:
  level: VERBOSE
  initial_level: DEBUG
  logs:
    sensor: VERBOSE

i2c:
  id: sensor_bus
  sda: GPIO21
  scl: GPIO22
  scan: true
  frequency: 50kHz

sensor:
  - platform: sht4x
    i2c_id: sensor_bus
    address: 0x44
    temperature:
      name: Temperature
      id: sht41_temperature
    humidity:
      name: Relative Humidity
      id: sht41_humidity
    precision: High
    heater_max_duty: 0.0
    update_interval: 30s
Before installing: confirm that i2c_id matches the bus you kept and that no top-level keys were duplicated. Validate and install using the node's existing installation method, then go to the local measurement check.
SHT41 uses platform: sht4x. If the previous configuration selected sht3xd, correct the component selection. A response at the same I²C address does not establish that the sensor protocols match.
Check that the SHT41 is publishing measurements
Once the firmware is running, look for the first evidence from the sensor itself. Open Logs for the installed node in Device Builder. If wireless logs cannot connect, use USB serial logs so you can continue checking the sensor locally.
The two configurations enable VERBOSE messages for the sensor tag. ESPHome 2026.10.1 puts ordinary sensor values at that level. The global compile level is VERBOSE while other tags initially remain at DEBUG. ESPHome logger configuration
- Check startup: find the expected
0x44response in the I²C scan. If it is missing, follow the no-device branch. - Check values: find the temperature and humidity sensor names in the
sensoroutput. The current output separates each name from its value with>>and includes the unit. - Check continuity: record timestamps and values across several updates. With this example, measurements should be roughly 30 seconds apart while the node remains running. Look for command, read or CRC errors between publications. Sensor output implementation
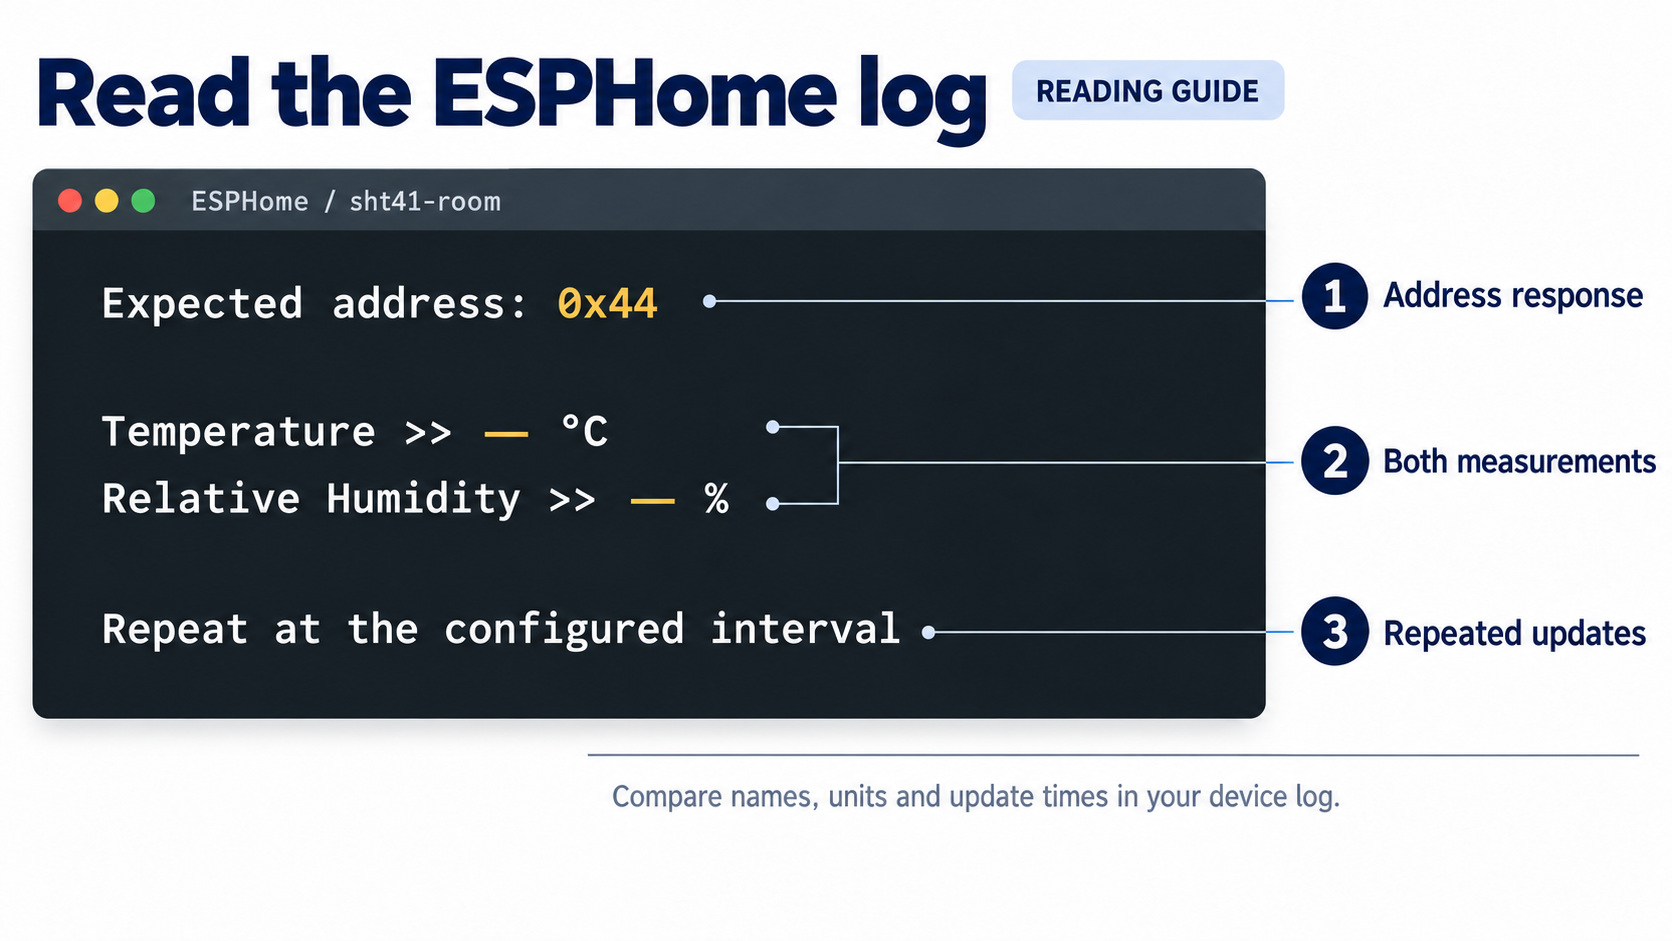
Proceed when both sensors publish repeatedly. An unchanged number can be normal in a stable room; the repeated publication is the evidence that the local path continues working. If values are absent, use the fault table before changing Home Assistant settings.
After verification, reduce the logging detail if it is no longer needed. Changing the compiled log level requires rebuilding and installing the configuration.
Add the SHT41 readings to Home Assistant
When both measurements are publishing locally, the next step is to carry them across the network. Home Assistant receives them through the ESPHome native API. You will use the API key saved with the node configuration when setting up that connection.
- Open Settings → Devices & services.
- Configure the discovered node, or select Add integration → ESPHome.
- Enter the node's IP address or hostname when requested. The default native API port is
6053. - Supply the same API encryption key configured for the node, then open that device's temperature and humidity entities. Home Assistant ESPHome integration
Compare a current publication in the device log with the matching Home Assistant entity, accounting for the displayed units and decimal precision. Confirm the node name and entity association when several room sensors are installed. If values change during normal room use, check that the change reaches both places.
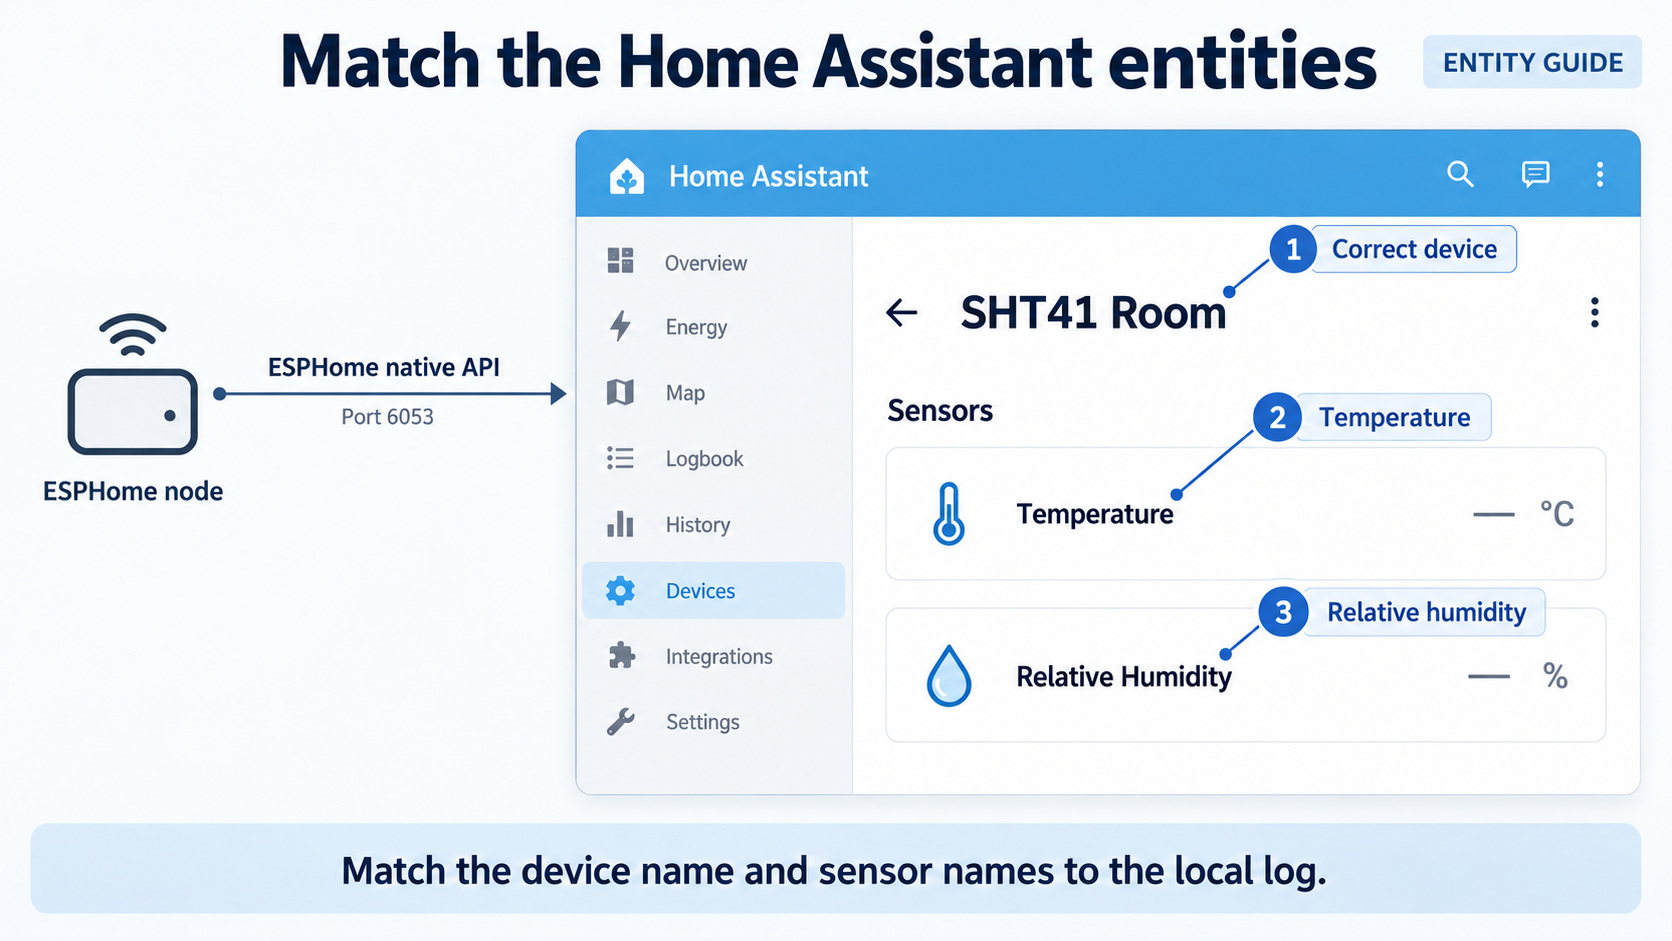
Home Assistant's last_changed time records a change in the state value. It is not a sampling counter, so a stable value alone does not establish that updates have stopped. Use the publication log to check continued sampling. Home Assistant state objects
Data-path checkpoint: confirm that the intended temperature and humidity entities receive the device's readings. You can then add them to a dashboard. If local publications continue but the entities remain without values, follow the Home Assistant branch in the fault table.
For a basic room monitor, the connection procedure is now complete. Continue with the installation checks below when readings seem wrong, heating is needed or you plan to use the values in an automation.
Find the next check from the error you see
If the expected result is missing, keep the last working stage in view. A failed address scan points you toward the board and bus. Repeated local readings followed by an empty Home Assistant entity point you toward delivery. Use the matching row below to choose the next check, and change one variable per trial.
| What you see | Start with this check | Then decide |
|---|---|---|
| No I²C device in the startup scan | Confirm power at the breakout and check actual SDA/SCL pins, ground and solder joints | Establish the electrical connection before changing the sensor configuration |
0x44 is found, but no measurements |
Confirm the physical model and platform: sht4x; inspect the following error |
An address response alone does not establish valid SHT41 readings |
Failed to send measurement command |
Inspect the supply, bus wiring and any line held low | Isolate shared-bus devices and test with the SHT41 alone |
Sensor read failed |
Read the preceding transport or CRC messages; inspect supply, leads and pull-ups | Use the surrounding error to choose the next electrical or configuration check |
| Local values appear, but Home Assistant has none | Check the API key, device address and integration for the correct node | Keep the functioning sensor path and investigate delivery over the network |
| Errors appear after adding a display or another sensor | Power down, disconnect the added device and repeat the baseline | If operation returns, review that addition's address, pull-ups, power and wiring |
The quoted component messages come from the ESPHome SHT4X implementation. Its shared Sensirion helper checks the cyclic redundancy check (CRC) for each received measurement word. A read failure therefore needs the surrounding log to distinguish a transfer problem from rejected data. Sensirion I²C helper implementation
If the scan finds nothing, measure the supply at the reference breakout's VIN and GND. With this wiring, expect approximately 3.3 V there. Check that idle SDA and SCL are also near the 3.3 V logic rail. A line held low or pulled toward 5 V needs an electrical investigation before further software changes. A multimeter can reveal those static conditions; it cannot establish signal-edge quality during a transfer.
Change one variable per trial and record the symptom, change and result. If a slower bus temporarily restores communication, review signal quality and the complete electrical path before accepting the fix.
If a bus line remains low, power down before removing devices. Isolate modules one at a time and inspect the affected connections. Repeated resets alone leave the cause unresolved.
If the readings look wrong, check the installation
Seeing values on a dashboard completes the connection, but it also raises the next practical question: do those values represent the room? An SHT41 measures conditions at its sensing element. Heat from the electronics or restricted air exchange can make that local environment different from the air you intended to monitor.
Four enclosure and PCB checks
- Reduce trapped air. Keep the space between the SHT41 and the vent small so less enclosed air must exchange with the room.
- Separate the sensing compartment. Shield it from warm air around the ESP32 and regulator, while keeping an open route to room air.
- Design the vent and protection together. Place openings close to the sensor and avoid blocked paths; evaluate any dust or splash barrier in the finished enclosure.
- Reduce PCB heat conduction. Keep the breakout away from warm electronics. For a custom PCB, evaluate sensor spacing, copper paths and isolation slots rather than relying on an enclosure partition alone.
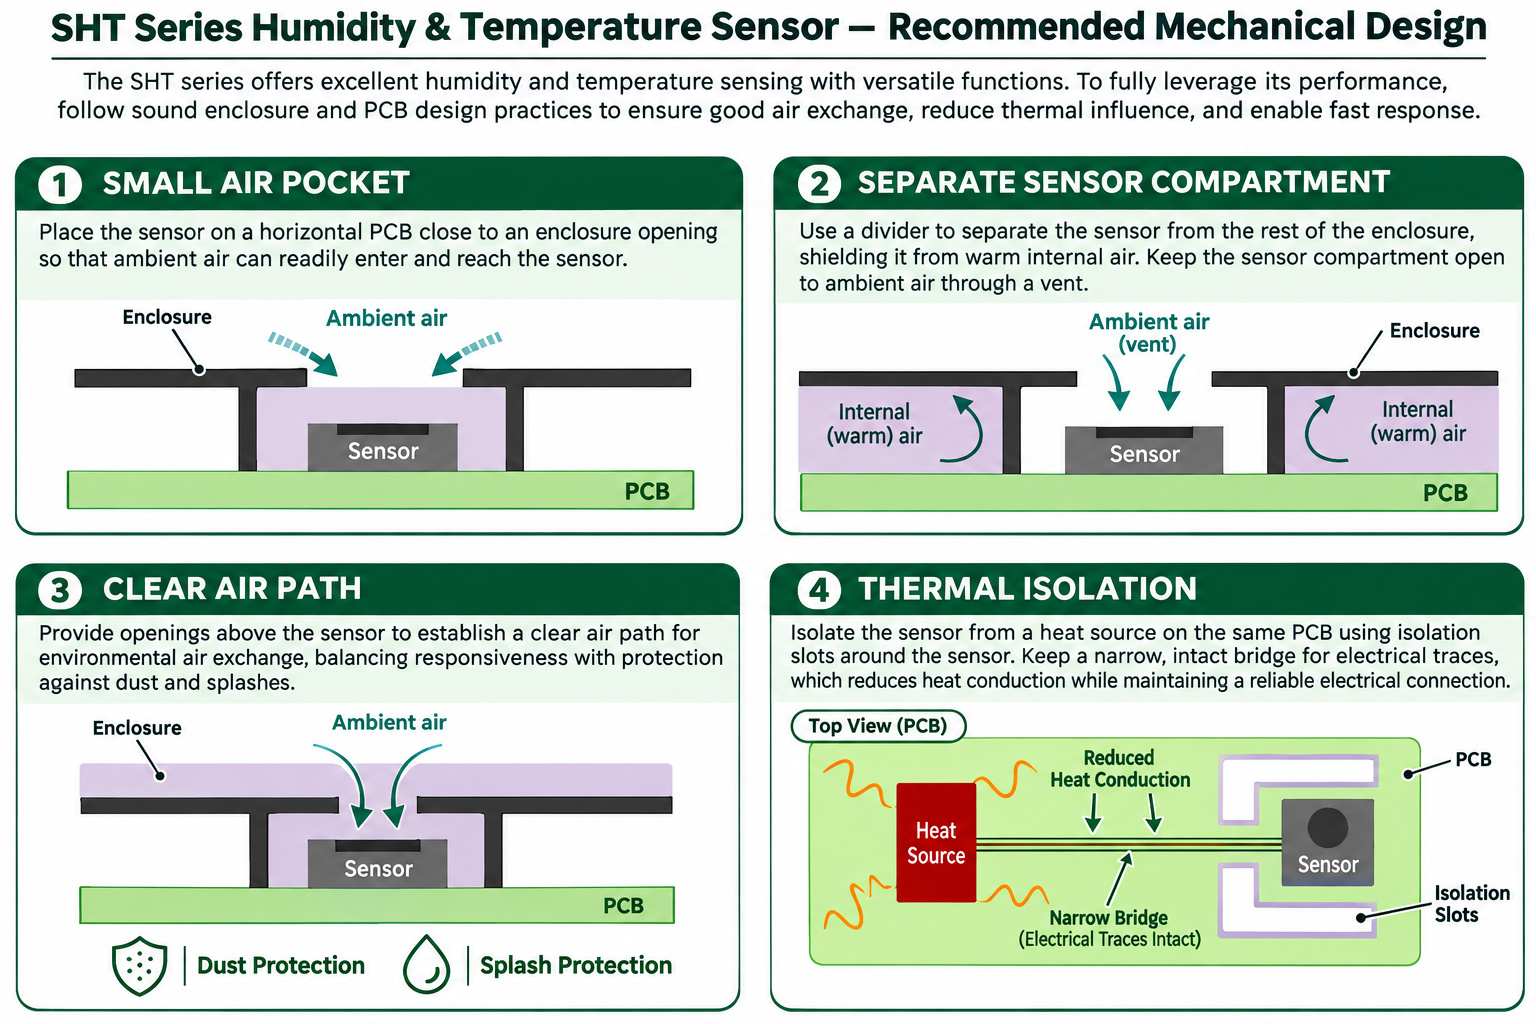
These checks follow Sensirion's design guide (sections 3 and 5).
Validate the finished arrangement: with the heater disabled, compare the SHT41 and a nearby reference exposed to the same local air. Keep the ESP32 workload and display state consistent during the open–closed–open test. Reference comparison guidance
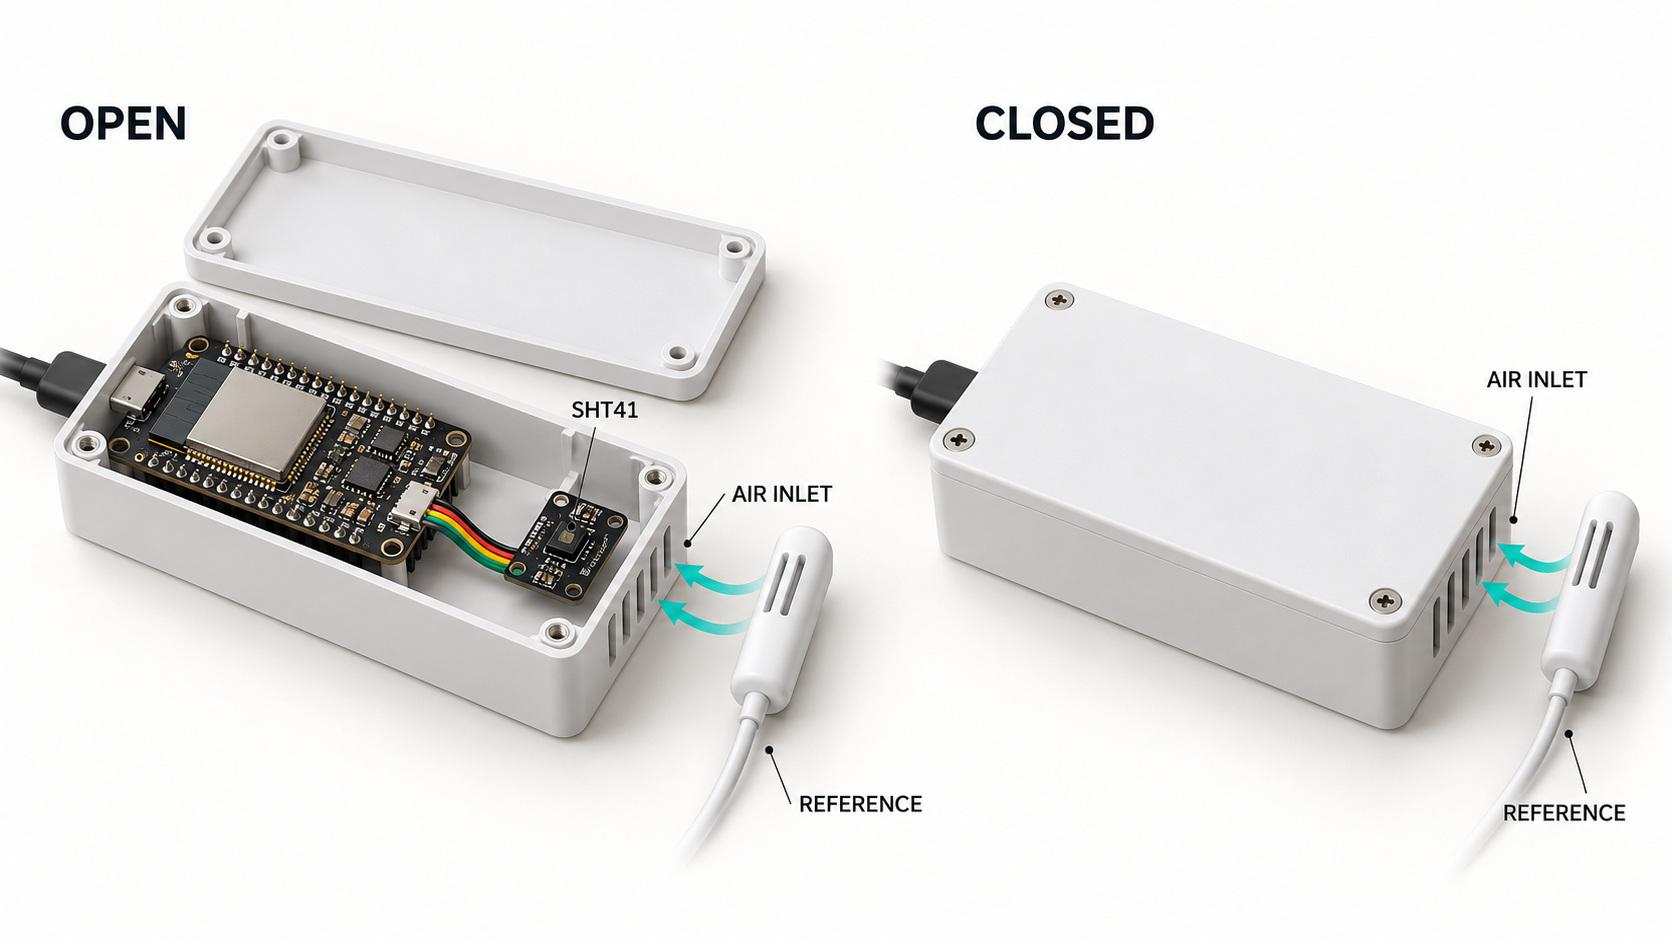
- Record the setup. Note the board, enclosure, reference instrument, sensor positions, update interval and heater state. Keep the reference in a fixed position near the enclosure air inlet, away from the electronics' heat plume.
- Establish the open baseline. Record timestamps and both instruments' temperature and RH values with the enclosure open and the heater off.
- Close the enclosure. Leave power, firmware and reference position unchanged. Continue recording the same quantities.
- Reopen it. Keep recording and check whether the closed-enclosure change reverses.
For each paired observation, calculate:
| Comparison | Calculation | Unit |
|---|---|---|
| Temperature difference | ΔT = T_SHT41 − T_reference | °C |
| Humidity difference | ΔRH = RH_SHT41 − RH_reference | Percentage points of RH |
To compare stable periods, choose equal-length recording windows and an allowable change suited to the reference capability and your application tolerance. Inspect the original values and the differences across adjacent windows. Extend the recording if a directional drift continues. Record the observed settling time instead of assigning every enclosure the same wait.
Compare the closed-state differences with the open baseline and the reopened result. A repeatable change that follows enclosure state is evidence to investigate thermal coupling and air exchange. If the reference also shifts substantially, the room may have changed and the comparison needs repeating. This procedure helps locate an installation effect; it does not by itself establish the sensor's absolute calibration.
Should the SHT41 heater be enabled in ESPHome?
If the installation investigation reveals a moisture problem, heater operation becomes a separate decision. Keep heater_max_duty: 0.0 while establishing the initial room readings, so the baseline has a clear heater state. Then evaluate whether the intended conditions require heating.
ESPHome exposes heater_power, heater_time and heater_max_duty; its documented maximum configured duty is 0.05, or 5%. That is a configuration limit, not a recommended operating schedule for every installation. SHT4X heater configuration
When heating is enabled, the current component publishes an ordinary measurement before issuing a due heater command and does not publish the heater command's own measurement. This scheduling leaves time before the following sample, but it does not verify that the sensor has returned to ambient conditions. SHT4X driver behavior
Evaluate heating when the application has a defined moisture problem. Check supply behavior and establish when readings become representative again under the actual enclosure and airflow. Sensirion states that normal sensor specifications do not apply during heater operation. SHT4x heater specifications
Check reliability before adding an automation
A first reading confirms progress. An automation also needs the node to return after a restart and keep delivering values in its final installation. Before using the readings to trigger actions, make these checks:
- Power-cycle the node and verify that local readings and Home Assistant delivery return.
- Review repeated updates for recurring errors and record any interruption.
- Compare the final enclosure against the reference arrangement.
- Repeat the relevant checks after adding a display or changing the power supply.
Retain the working YAML, software version, board identification and a short startup/publication log. If a later change causes a fault, those records provide a concrete baseline for comparison.
Frequently asked questions
Can two SHT41 sensors share one ESPHome I²C bus?
Two standard SHT41-AD1B devices share address 0x44 and cannot be addressed independently on one unseparated bus. Use separate supported I²C buses or a suitable multiplexer, then assign each sensor to its actual bus. ESPHome I²C buses
Is MQTT required for this SHT41 Home Assistant setup?
No. This configuration sends the SHT41 entities through ESPHome's native API. Home Assistant connects to the ESP32 directly, so this setup does not require an MQTT broker. Home Assistant integration
Technical references
Use the component documentation for configuration and the implementation links for the version-dependent logging and driver behavior discussed above.
Moving from a breakout prototype to a custom PCB?
For a custom PCB, consider NYFEA FHT41 during sensor selection. It is a separate device from Sensirion's SHT41, so verify its electrical limits, commands, package and software support against your design.